Support

General Support Topics

1 - Database Engines

NileBASE Applications backends are: InterBase/Firebird SQL RDBMS Database Engine & MySQL.

Firebird Installation:

Normally the installation file is in folder D:\NileBASE\FB
Firebird Setup File:
FB305x64.exe
FB3011x64.exe
For 64-bit Operating System, x64-based processor and 4 GB of RAM or more. If the RAM is less than 4GB it is better to use FB305x86.exe even if the system is 64-bit.FB305x64.exe Firebird Setup File:
FB305x86.exe
FB3011x86.exe
For 32-bit Operating System, x86-based processor and 2 GB of RAM or more.


On Server or Stand Alone Computer where the Database is located:

Three important things should be done during the installation process:

1. Select Components:
On server computer select (Server components). (Selected by default).

Add Firebird SQL Server to Firewall Exceptions on Windows or any other third party Security Software. Select exception for Private, Public and Domain if active directory is installed. Or open port 3050 on Server Firewall Rules.

On client computer (Server components) is should be unchecked.


2. Select Additional Tasks:

Required options are selected by default. Just add the following:
- Check ‘Generate client library as GDS32.DLL for legacy InterBase support’.
This option for Firebird Version 3.0.5 and not needed for Version 3.11’.

This Option should checked on both Server and Client machines.


- Check 'Use the Gardian to control the server' (optional).


3. Create a password for the Database System Administrator:

Type the default password for Firebird Database Server, which is: ‘masterkey’.

Password may be left blank on client machine.


2 - NileBASE Applications Environment:

Native Code. No installation required. Database Engine: Interbase/Firebird SQL RDBMS:

Working Environment of NileBASE Applications

Step 1: Server Side Installation:

1. Program and Database Folders
Program Folders: e.g.; on Drive D:
D:\NBData - For Databases
D:\NileBASE - For Applicarions or excecutables

Copy these two Folders to the root directory of any Drive.
To avoid using Operating System Volume, it is recommended
to use drive D: or E: if available.

The following steps are the same whether you install the
application on a server or stand alone computer. Open folder
D:\NileBASE Then you will get some subfolders:
\Rmcf3 (This folder name differs according to NileBASE Application)
\FB (This is the Firebird Database Server Installation program)
Open D:\NileBASE\FB folder.
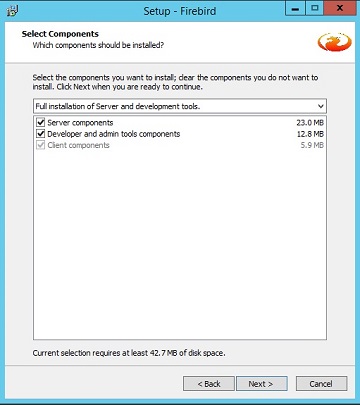
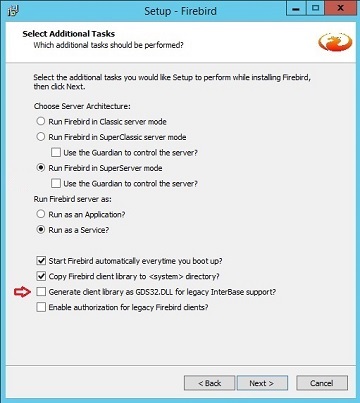
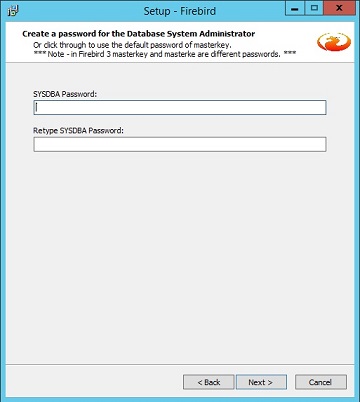
Install Firebird Setup File: FB305x64.exe or FB305-Win32.exe.
Follow the instructions on section 1: Database Engine.
Go back to NileBASE folder and open this folder: Rmcf3 then
right click on NBRmcf3.exe and send to Desktop (Create Shortcut).
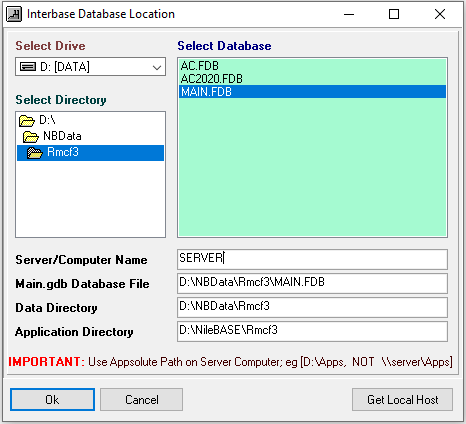
Run the application and the image on the right will appear:

On the screen: Double click on the drive letter (in our case D:)
Double click on NBData then Double click on Rmcf3 the Data Files
will appear on the right pane. On the other window,
just click on MAIN.FDB to highlight it, then other fields will be populated.
Finally click on the Button (Get Local Host) to read the Name of the
Local Computer that will host the Application and the Database.
Click Ok to finish this setting. This process creates a simple text file with the name (AcDb.txt).
It is a Connection String for the program to find the Database.
It reads like this:

SERVER (Host Computer. Or use: 127.0.0.1 for Stand alone PC)
D:\NBData\Rmcf3\MAIN.GDB (Main Database File)
D:\NBData\Rmcf3 (Database Directory)
D:\NileBASE\Rmcf3 (Application Directory)

For any reason in the future you want to change the drive or the Host Computer, you should delete this text file (AcDb.txt) and the program will help you create it again.

Note: the above screen will only show when the file (AcDb.txt) does not exist in the Application Folder.
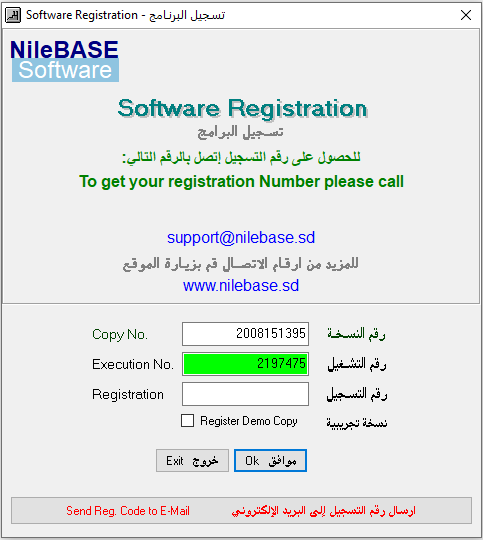
Now you can run the Application normally. Default password is (11) for any new program installation. If the installation is on Server Machine, create [standard user] and share NileBASE folder as [READ OLNY] NOT Read/Write. The D:\NBData folder should never be shared, so Client User cannot delete the Application or the Database. Also no viruses can go to the Server Machine from any client computer. This is the major benefit of Client/Server Database Technology which is characterized with Security, Speed, Stability and high performance.

Step 2: Client Side Settings:

--- From the Client Computer search for the Server by name or IP address:
--- Type in address bar of the file explorer: \\(SERVER NAME) or (Server IP).
--- You will prompt for Username and Password.
--- After correct credential the shared folder ‘NileBASE’ will appear.
--- Open the folder. Then open FB folder. Setup Firebird as described above.
--- Follow the instructions on page: Database Engine Installation
--- Remember to deselect ‘Server Component’ during the installation process.
--- Go back to NileBASE Folder.
--- Enter Rmcf3 folder.
--- Right click on NBRmcf3.exe. Send to Desktop (Create Shortcut)
--- Run the Application


3 - NileBASE Applications Registration

Software Registration is required in two cases:
1: New Program Installation
2: Program transfer to another computer or server

If you run the Program for the first time in one of the above cases, you need to register it.

There are two ways to register new or transferred programs:

1. Request a registration key by contacting support
When you run the program, the sceen on the right will appear.
Call Suppet and provide them with Copy and Execution numbers
and request for Registration Number.


2. Send registration key to your email (Recommended)

For this option the email must have been added to client information record. This is done at the time of purchase or later update of client information with NileBASE Support Team. So it is very important for every client to make sure that the email is added to the company information record. If you go for option 2 the screen on the right will show.
Just click Send


4 - NileBASE Database Backup

Application: Built-in procedure
available in all NileBASE Applications.

There are two backup methods in all NileBASE Applications:

There are two methods to backup databases:

1. Automatic Backup
This method creates a backup file of the current opened year database. When the program is closed, a backup file is created on local computer, whether the database is installed in this computer or on a server, provided that the default backup folder is defined in program settings. So in Program Settings the name of the folder where the backup files will be saved must be defined.

2. Manual
Under Settings in the main menu, there is a menu item: Backup Database.
It gives an option to select the target drive and folder. The targent can be a local drive or external storage device. The backup file name is the same as the source database name with file extension: .FBK. Default Firebird Backup File.
This method backups up all databases in the source folder.


INFO:

NileBASE Applications are usually stored into two folders:
1. NBData. Files in this folder are database files. Data in these file changes every time a new transactions is made. So backup methods mentioned above only work with these databases to constantly maintain last data. They do not backup the Application Program Files since they do not change.
2. NileBASE. This folder contains the Application Program Files. Files in this folder never change. They are replaced only when updated to a new version. Every version update is matching with the corresponding database files.

IMPORTANT:

Default folders are e.g.:
D:\NBData
D:\NileBASE
It is important to copy the entire Application Physical Files manually from the server computer at leastone time after last Program Version Update. This is because the initial setup Program File might beoutdated. In such a case the restored atabases from last backup files may not be compatible with the Program File.
It is highly recommended to make all backups on external drive or media andKeep them in a different location.

5 - Database Restore From Backup

NileBASE InterBase/Firebird Restore Utilty
Application Name: FBRestore.exe

It is a Standalone Application. No installation is required. It can be downloaded fromhere.

Requirements: Firebird Engine of the same version as that of the backup or higher must be installed. Older versions will not work.

To restore a database from a backup file, follow these simple steps:
1 - Run the FBRestore.exe and press Restore button. This screen will appear.
2 - Under [Source] select the Drive Letter where the backup files are located.
3 - Double click on below folders to go to backup source files .FBK.
4 - Under [Database Files] select each file and press the Restore Button/F3.
5 - The original Database file will be restored with same name but with .FDB extension.

For more info on Restore Database Files contact: support@nilebase.sd

6 - NileBASE Application Transfer

How to move the program and data to a new computer

There are two possible senarios:

1. Server Change:

Copy program and database folders from current computer:
D:\NBData
D:\NileBASE
Paste the copied folders onto the new computer. It may be on a drive with same letter or a different letter.
Follow the structions on the following sections on the pages:

1. Database Engine Installation
2. Standard Installation Folders
3. Application Registration

2. Hardware Failure:

Here comes the importance of having a copy of physical folders of the program and databases which is indicated on page Database Backup Methods under title: IMPORTANT.
A - Copy these folders onto the new computer. It may be on a drive with same letter or a different letter.

D:\NBData
D:\NileBASE

B - Restore Databases from the latest backup files using the Restore Utility NBRestore.exe. You may find many backup files. Try to locate the latest based on file size, date and time. The restore procedure is very simple. More info on Database Restore from Backup
C - After all Databases restoration follow the instructions on the following sections on this pages:

1. Database Engine Installation
2. Standard Installation Folders
3. Application Registration

7 - User OS Settings

Windows Settings

For data entry, the language to use in addition to English must be defined in the Control Panel.

1. Since the database is not set as Unicode, the language must set this Control Panel page.

2. The standard Date Format is: dd/mm/yyyy

3. Type of Digits may be select as preferred